
This poor neglected blog is taking a turn today. I will still talk about my jewelry here but the turn it is taking for now has to do with my battle with cancer as an artist and a person. I'm not sure exactly where my writing will go beyond sharing my experiences. I was diagnosed with stage 2 cervix cancer in June 2015. I also had a lymph node in my pelvis that was cancerous as well. I went through about 3 months of daily radiation and weekly chemo therapy. In early December 2015 I had another PET/CT scan to see how the treatments had worked. The results were mixed. My cervix cancer was all but gone, however the affected lymph node is showing greater signs of a more aggressive cancer and a few more lymph nodes near the initial one are showing signs of cancer as well. Now you have enough back story for the rest of this to make sense.
So my hair started falling out from the chemo. About half of it is gone now.
I had a lot of fear and trepidation over loosing my hair. Then I realized why. Not just the surfacy reasons of vanity type self image but the deeper reason of why the thought of loosing my hair really bugged me. No matter how down on myself I ever got or how bad about myself I would feel my hair was the one thing that I always knew I could get compliments on and feel good about. Loosing my hair meant loosing that safety net for me. Like Linus Van Pelt without his blue blanket.
My hair has always been a big part of me. Part that I have hated and part that I have loved. When I was young my hair was cut short because of how thick and curly it was. Really short when I was little, with my hair being as thick as a poodles fur it was cut poodle short just so my mom could get a brush through it. As I got older the curls relaxed but I still kept kept it short until I was in high school when I started growing it out because I got sick of the poof ball that my hair was. I didn't feel good about my hair when it was short even though I got compliments.... Perhaps that was just the mind and feelings of a preteen into teen. Anyway, once I started growing my hair out long I started liking my hair too. The long curls also went well with the feelings of wanting to hide while I was going through depression. I would let my hair fall over my left eye... safety when I was feeling vulnerable in the world. I would get compliments on my hair all the time along with compliments on me as a person. That started helping me out of my depression and I began feeling good about myself. I started loving my hair even when I didn't take as good of care of it as I should.
Now, I cannot pretend that I am not loosing my hair nor can I try to convince myself that none of this is really happening. I have psychological issues just like every one else. When I found out I had cancer I actually took it well. The ER doc even made a comment on that she had just told me that I have cancer and there I was making her feel better. I realized that there were many carcinogens I came in contact with throughout my life by knowledgeable choice and that there was always a risk from paints, chemicals, what not. So why should I get pissed or whine over why me? It didn't make sense so I didn't. I did snap and have a mental breakdown though and it hasn't been pretty. I snapped and just shut down when I found out that the initial radiation treatments would take three months to clear out of my system; and I couldn't have a PET/CT scan to see if the radiation and chemo worked until the radiation had run it's course. It was a nurse who told me that, not my doctor. There were quite a few things my doctor never told me or told me well after the time she should have told me. I honestly believe right now that I would not have snapped the way I did if I had the information I needed from her. And that is enough background there for now. I had only set myself up to battle until Sept and that is when I was done with treatments and supposed to be on the healing end with the side effects going away, etc, etc. At least that is where my mind was when I was told the radiation would continue to affect me for three more months. That is when I snapped and started denying all of my fears, started lying to myself and in turn my husband and son.
When I started cancer treatments I was told the radiation and chemo would mess with how my mind works. I was also told I would go through menopause and knew that would change my brain chemistry and in turn change how my mind works. I have been through depression in my life. I have been through taking a long hard look at myself, the good with the bad and deciding what and how I want to be. Taking a look at myself in those ways was one of the best things I could ever do for myself. I have the hardcore believe that everyone is responsible for their own actions. Each person is responsible for how they treat other people. Each person can choose how they look at the world by opening their eyes and looking to see what is really there. That is why when I started my cancer treatments my husband and I talked about the treatments and menopause affecting how I think and act. I asked him and down right demanded that he NOT go easy on me and just let me run amuck. I know I can be a very difficult person so he cannot go easy on me for my own sake. I don't want to be a person who treats people badly, I need to know when I am so I can take a look at myself and stop it. My husband has enough faith in me, who I really am, that he has been following exactly what I ask and has been telling me where I have been messing up and not acting like me. Now mind you these are all my words written here. Unless I actually quote something from my husband, please do not assume those were the words he used. The writing and word choice here is on me. That personal responsibility thing I was talking about ;) My husband has also caught a lot of flack (to put it very mildly) for doing exactly what I asked because the general consensus in our society is you don't tell cancer patients that they are behaving badly. I am a cancer patient, I am fighting not just for my life but for my own identity right now and if it means that my husband has to say a harsh word to me now and then because I am being an idiot and going against my own morals, principles, and beliefs that I have built my life on then please, bring it on. That is something I need in my life. I need someone who will help me see clearly to being the me that I want to be. If I cannot have that then what am I fighting for?
It is precisely because my husband stood up for himself and told me that I was not acting like me, that I know I am more me today than I was a month ago. Because he does not back down when I am not looking at myself, when I am denying and lying to myself; today I am able to come to terms with the fact that I am loosing my hair. Today I can admit to myself and anyone else that I was afraid to loose my hair because it was a security to me. I can also see that I hung too much on my beautiful hair and not enough belief on myself. It was a narrow minded way that I used to feel worth within myself. Because my husband was with me, encouraging me at every turn and not backing down but never striking back in word or deed when I was off my rocker that I can say with confidence I am loosing my hair and I don't care. Yes, I am still nervous over presenting my bald self to people but I know it is going to be ok. I know I am a good worth while person and what I look like cannot in any way shape or form negate the good person that I am and strive to be.
----------
It is now several hours after I wrote all of that. Once I finished writing I went up stairs and brushed my hair. And brushed it, and brushed it.... Finally it got to a point the bath water was getting cold and there was still hair coming out in the brush and on my fingers and I was done with it. Although I was happily listening to music and quite cheerful as I was brushing my hair out it had just gone on long enough. So I asked my husband to trim down the remaining... short... like buzz cut short. Now I am sporting a punk type hair style with shaved sides and all! I like it to the point I am seriously considering rocking this hair style again for a while when my hair starts growing back :)
Saturday, January 23, 2016


Friday, November 22, 2013
Mishaps of the Torch Forged Rings
Mishaps of the Torch Forged Rings
My latest posts were on the process I use to make sterling silver forged rings. Those posts covered the process and work involved in making the rings. What those posts did not include was the mishaps and damage done while making them. Jewelry making is no exception to the possibility of things going wrong and some things did go wrong while I was forging those rings.
The first was during the first of the last hammering session. Yes there was a second set of hammering sessions but I will get to that in a bit. This was a simple mistake that thankfully did not have disastrous results. While I was moving the bar of red hot sterling silver from the charcoal blocks to my steel pounding block I didn't have a good enough grip on the silver with the pliers and the silver fell to the floor. I am really glad that I don't like the carpeting in my studio because it got singed the moment the hot sterling landed on the floor. I was able to pick the silver up quick enough that the carpet didn't catch fire but the carpet is now branded for life. Had the carpet caught it would have been a simple matter to put it out. Not more than 5 inches from where the silver fell is my quenching container. I keep water in there constantly so the container would have been quickly dumped before any major damage could be done.
The second mishap was in the soldering process of the Ogham ring that wasn't caught until it was an issue. While I was working on sizing the ring the solder joint partially broke. I decided to cut the solder joint and re-solder the ring. This was a mistake that I have learned from. While I tried to cut the joint itself I actually cut slightly to the side of the joint. When I was soldering the ring for a second time the first solder joint melted and I ended up with a narrow piece of the silver ring shifting out of place. I have realized since then I should have forced the joint to finish breaking instead of trying to cut exactly on the joint. The result of choosing to cut the joint was having to remake the ring from scratch. I melted the ring with some extra sterling silver and proceeded to hammer that ingot into the stock for the band. I was quite frustrated and working against a deadline so I don't have any photos of this mishap.
The final mishap occurred while I was remaking the Ogham ring. The pliers that I was using are one of my favorite pair of needle nose pliers. They were a nice set of well made old pliers that my mom gave me after she had used them for years. They helped me fix my husbands bike after I accidently broke one of the aluminum screws while we were working on the bikes carbs. Had these pliers not been such a nice pair I would not have been able to get the broken screw out of the carb bowl. The
teeth bite into the metal just enough to hold the silver securely while I am hammering but not so deep a bite that it is impossible to remove the marks without too much difficulty if the ends aren't cut off. The jaws of the plier have a beautiful long taper to small pints which is perfect for holding the metal without getting in the way. As I said they were a nice set of pliers. After I melted the ring and was starting to hammer the silver into shape for the band I brought the hammer down hard on the tip of my pliers breaking one of the tips off. I quit working on the ring for the night after breaking my pliers. The next day I finished off the hammering with a different pair of pliers that have no sentimental value what so ever. Since I took the photo of the pliers I did find the tip that broke off. It has been sitting on my computer desk since. I am thinking of making something else out of the pliers. That won't happen until we get a proper forge going. Until then the pliers will be kept and perhaps turned into a snub nose pair.
Issues like these arise out of the blue while working and I often learn from them. When I can't find a lesson in it I add it to the list of "Well that was dumb." Thankfully the list of success is far longer than the that was dumb list.
 |
| Singed carpeting from dropped hot sterling silver |
 |
| Finished rings |
The final mishap occurred while I was remaking the Ogham ring. The pliers that I was using are one of my favorite pair of needle nose pliers. They were a nice set of well made old pliers that my mom gave me after she had used them for years. They helped me fix my husbands bike after I accidently broke one of the aluminum screws while we were working on the bikes carbs. Had these pliers not been such a nice pair I would not have been able to get the broken screw out of the carb bowl. The
 |
| My poor broken pliers |
Issues like these arise out of the blue while working and I often learn from them. When I can't find a lesson in it I add it to the list of "Well that was dumb." Thankfully the list of success is far longer than the that was dumb list.
Friday, November 15, 2013
Handmade Torch Forged Rings p5
It has been a lot of work but we have finally reached the last steps in making these rings. The following is a continued description of how I make my hand forged
rings. It is a long involved process so I am splitting this description
into several posts. This is the fourth of these posts. The previous
parts can be found here: Part 1, Part 2, Part 3, Part 4.

When the rings come out of the pickle pot they are white. I'm told the white is pure silver on the surface but I don't know if that is true or not. It is just the way sterling silver is when it comes out of the acid solution.
The rings are now formed but there is still work to be done. First is to round the rings on a ring mandrel as the process of aligning the joint earlier never allows for a truly round ring. Also the rings are hammered with a rawhide mallet on the pounding block to take out any warping in the band. Once the ring is round and no longer warped, it is time to sand and file again. The outside and inside of the band get filed to remove excess solder then sanded for smoothness. Next comes the edges of the rings that I did nothing with while the ring band was still flat. First both edges get filed and checked with a caliper for consistent band width. Adjustments are made according to the caliper readout. Again this is not a machine precise process but I try to stay well below a 0.1 mm variance.
The flats of the edges are then sanded with the previously mentioned regiment of grits and the inside of the edge is filed to round it out a bit. Next comes final sizing. For this it is a repetitive process of putting the ring on the ring mandrel and hitting it with a rawhide mallet. Through using the mallet and flipping the ring over throughout this process the ring is stretched to the proper size. This process can involve using a steel hammer if the there is too big of a difference between the size the ring is and the size it needs to be. If a steel hammer is used the outside of the ring is again filed and sanded to take out any hammer marks.
Once the ring is the proper size the outside of the edge gets filed and both the outside and inside edges get sanded to remove file marks. This makes for a more comfortable fit as there isn't a square edge to press against fingers when worn. This part of the process is the same for forged and fabricated rings.
After all file marks and scratches have been removed from the outside, inside, and edges of the rings they are polished. For this I use a muslin wheel with polishing compound on a flex shaft. I don't have a spot to set up my polishing station with the big muslin wheel yet but that will come in time. After polishing the rings are put into an ultrasonic with a bath of cleaning solution followed by a water rinse. This removes the excess polishing compound from the rings. For plain bands the rinse and a final wipe down with a polishing cloth is the last step but not for the two forged rings pictured here.
The forged rings pictured here have one more bath to go through. After they have been cleaned by the ultrasonic they are heated under running water and put into a warm liver of sulfur solution to antique them. This oxidizes the sterling silver causing it to turn black. Yea I know I already went through two processes to remove the oxidation of fire scale and now I am oxidizing them on purpose. Seems a little silly but this is how the lettering gets black. The liver of sulfur solution turns the whole ring black (and sometimes interesting shades of blue) not just the lettering. So to remove the excess black from the high points of the ring and leave it only in the low points of the lettering the rings are sanded one final time with a used piece of 2000 grit sand paper. Being a used piece of sand paper it isn't as harsh as the fresh sheets of sand paper and it removes the oxidation without putting scratches into the ring. The sandpaper at this point only dulls the rings down a little. After the rings are sanded I shine them back up with a polishing cloth and the forged rings are finally finished ready to go to their new homes.
This concludes how the forged rings are made. Next week the mishaps that occurred ;)
Torch Forged Rings
Part 4 - Rounding, Filing/Sanding, & Finishing
made by Ash
Unicorn's Garden

When the rings come out of the pickle pot they are white. I'm told the white is pure silver on the surface but I don't know if that is true or not. It is just the way sterling silver is when it comes out of the acid solution.
 |
| Rings fresh out of the pickle pot |
The rings are now formed but there is still work to be done. First is to round the rings on a ring mandrel as the process of aligning the joint earlier never allows for a truly round ring. Also the rings are hammered with a rawhide mallet on the pounding block to take out any warping in the band. Once the ring is round and no longer warped, it is time to sand and file again. The outside and inside of the band get filed to remove excess solder then sanded for smoothness. Next comes the edges of the rings that I did nothing with while the ring band was still flat. First both edges get filed and checked with a caliper for consistent band width. Adjustments are made according to the caliper readout. Again this is not a machine precise process but I try to stay well below a 0.1 mm variance.
The flats of the edges are then sanded with the previously mentioned regiment of grits and the inside of the edge is filed to round it out a bit. Next comes final sizing. For this it is a repetitive process of putting the ring on the ring mandrel and hitting it with a rawhide mallet. Through using the mallet and flipping the ring over throughout this process the ring is stretched to the proper size. This process can involve using a steel hammer if the there is too big of a difference between the size the ring is and the size it needs to be. If a steel hammer is used the outside of the ring is again filed and sanded to take out any hammer marks.
Once the ring is the proper size the outside of the edge gets filed and both the outside and inside edges get sanded to remove file marks. This makes for a more comfortable fit as there isn't a square edge to press against fingers when worn. This part of the process is the same for forged and fabricated rings.
After all file marks and scratches have been removed from the outside, inside, and edges of the rings they are polished. For this I use a muslin wheel with polishing compound on a flex shaft. I don't have a spot to set up my polishing station with the big muslin wheel yet but that will come in time. After polishing the rings are put into an ultrasonic with a bath of cleaning solution followed by a water rinse. This removes the excess polishing compound from the rings. For plain bands the rinse and a final wipe down with a polishing cloth is the last step but not for the two forged rings pictured here.
 |
| Finished Torch Forged and Stamped Rings |
This concludes how the forged rings are made. Next week the mishaps that occurred ;)
Friday, November 8, 2013
Handmade Torch Forged Rings p4
The following is a continued description of how I make my hand forged rings. It is a long involved process so I am splitting this description into several posts. This is the fourth of these posts. The previous parts can be found here: Part 1, Part 2, Part 3.
Unicorn's Garden
Torch Forged Rings
Part 4 - Stamping, Forming, & Soldering
made by AshUnicorn's Garden
Part 4 begins with stamping lettering into the cut, filed, and sanded ring band stock from part 3.
The next step for these particular forged rings is to stamp the letters into them. This process begins with marking where the letters will go. For the size 9 ring I hand draw the Ogham lettering onto one of the faces of the flat band with a Sharpie marker. Along the width of the ring I use a caliper to measure and mark out the center line. For the length I center the lettering with the aid of the design printed out on paper beneath the flat band. I also use the printed paper as a guide to draw out the Ogham lettering. After the lettering is carefully marked out on the silver I use a stamping tool in conjunction with the steel hammer and pounding block to hand stamp the lettering into the ring band.
For the size 10 ring I mark the center of the ring length again with a Sharpie marker using the caliper as my guide. With the center point marked I use individual metal letter stamps working from the center point out. Each letter stamp is carefully lined up according to its appropriate placement. The letters nearest the center of the word are positioned according to the center line and each successive letter is positioned according to the previously stamped letter and what letter it is being stamped. Kerning (the spacing between letters in typography) is all controlled by where each letter stamp is placed and struck. Because different letters take up different amounts of space from left to right this part of the process would be too complicated to work out mathematically before hand and the spacing drawn onto the metal so this process is all done visually. The purpose of kerning is for visual appeal after all, so there is no need for mathematical precision.
When the ring design does not call for stamping I skip the steps used in stamping and go right onto forming the ring. This step begins with hammering the flat bands around a metal ring mandrel to form a circle. It continues with fine adjustments using pliers and often time gentle filing to make a flush meeting between the ends of the circular band. The goal of this step is to leave no gaps between the two ends wen looking at the inside and outside faces of the band or when checking the width of the band. The test to see if the band is meeting up properly is very low tech. The joining part of the ring is held up to a light source. If light can be seen coming through the joint from either the edge of the ring or the faces of the ring adjustments have to be made to correct that. This may sound easy but it can be a very frustrating point as a small adjustment to one small section, either with the pliers or a file, can easily misalign another part of the joint. This step is crucial in any fabricated ring forming process as an improperly prepared joint will "pop" and break during the final sizing process.
After fiddling with the joint to get it properly aligned it is time to prepare the ring for soldering and then the soldering itself. I use a few things to make the solder, shall we say behave the way I want it to. Solder likes to spread and run wild some times. Not staying where it is supposed to be and going where it aught not. To prevent this I prepare the ring with a bit of correction fluid or commonly called white out. I coat both sides of the joint with the correction fluid leaving only the joint itself and a small aria to either side uncoated. The correction fluid keeps the solder from spreading beyond the joint itself. It can also be very useful in projects that require soldering in several places. By coating one soldered joint with correction fluid while soldering another part it prevents the solder of the first joint from flowing anywhere. I will admit there are times I wonder what will happen to the availability of correction fluid if we do completely move to a "paperless" society. Just one of the many odd things I think about while I'm working but that is for another time.
While the correction fluid is drying I cut the pieces of solder that I am going to use on the ring from a piece of sheet solder. The solder "chips" I cut are only about 0.056" square. This is also the time I prepare the flux using a mixture of boric acid and water. The flux is the second thing I use to make the solder behave the way I want it to. Flux of one form or another is used in any soldering process to make the flow of melted solder smoother. Solder is more likely to flow in a fluxed aria than a non fluxed aria. It also slightly cleans the metal being soldered so the solder adheres better. I then apply the flux directly to the joint and put the ring in an alligator clamp. I carefully place the solder chips into place and start heating the ring with a torch. The torch flame itself is the final thing I use to control how the solder behaves. Melted solder tends to move toward heat so I use torch specific techniques I have developed over time to make the solder flow into the joint. I won't go into the techniques because they really wouldn't make much sense in written out form. The techniques used are also very ring specific, I don't use every technique on every ring or even every soldering project. I use what each project calls for at the time.
As I mentioned before I do not quench forged rings at any point during the process. If you have read through the steps up till now you can see I would be wasting a lot of time and effort by quenching and thus annealing (making them more malleable) the rings at this point. So the rings are soldered one at a time and then removed from the alligator clips and left on the charcoal pieces or soldering pad to cool slowly.
Once the rings are cooled it is time to clean off the correction fluid and pickle the rings. Pickling refers to placing the rings in a heated acid bath to remove the fire scale and flux after soldering. This is a very easy step which consists of letting the pickling pot warm up and then letting the rings sit in the acid while I wander off to do something else for a short time.
Part 5 will be posted on Friday 11/15/13
The next step for these particular forged rings is to stamp the letters into them. This process begins with marking where the letters will go. For the size 9 ring I hand draw the Ogham lettering onto one of the faces of the flat band with a Sharpie marker. Along the width of the ring I use a caliper to measure and mark out the center line. For the length I center the lettering with the aid of the design printed out on paper beneath the flat band. I also use the printed paper as a guide to draw out the Ogham lettering. After the lettering is carefully marked out on the silver I use a stamping tool in conjunction with the steel hammer and pounding block to hand stamp the lettering into the ring band.
 |
| Lettering Stamped into ring bands |
 |
| Formed and aligned for soldering. |
 |
| Prepped for soldering. |
 |
| Freshly soldered joints before any cleaning. |
As I mentioned before I do not quench forged rings at any point during the process. If you have read through the steps up till now you can see I would be wasting a lot of time and effort by quenching and thus annealing (making them more malleable) the rings at this point. So the rings are soldered one at a time and then removed from the alligator clips and left on the charcoal pieces or soldering pad to cool slowly.
Once the rings are cooled it is time to clean off the correction fluid and pickle the rings. Pickling refers to placing the rings in a heated acid bath to remove the fire scale and flux after soldering. This is a very easy step which consists of letting the pickling pot warm up and then letting the rings sit in the acid while I wander off to do something else for a short time.
Part 5 will be posted on Friday 11/15/13
Friday, November 1, 2013
Handmade Torch Forged Rings p3
The following is a continued description of how I make my hand forged rings. It is a long involved process so I am splitting this description into several posts. This is the third of these posts. The previous parts can be found here: Part 1, Part 2.
Unicorn's Garden
Part 3 begins with cutting the prepared ring band stock from part 2 into the right size/s for the ring/s.
In this run the silver ingot was sufficient to produce two rings, one in size 9 and one in size 10. Both ends of the silver bar were cut off and become scrap to be recycled. This is because that is where I hold the silver while hammering and the ends have marks from the teeth of the pliers that are too deep to file out. The ends also tend to be rounded and have too much variance in width and thickness.
I use a chart that I created years ago in conjunction with my ring mandrel to determine what length to cut the ring bands. The chart has full and half ring sizes from size 1 to size 17.5 with their corresponding circumference in inches. The circumference length in my chart is
a little smaller than the actual finished size but the reason for that comes in later.
With the ring bands cut to their proper length I then start the filing and sanding process. I use a hand file to smooth both sides of the silver leaving the edges alone at this stage. This stage is to even out the high and low parts created by the hammer from what will be the inside and outside of the ring. I use the fire scale on the silver to determine when this process is finished. Fire scale is the dark coloring left on a piece of silver (or other metal) from either a casting or torch heating process. It is essentially a coating of oxidized silver. Once the flat silver bands are smoothed out with the file the sanding process begins. I start with a piece of 800 grit sandpaper on a sanding stick to remove the file marks
from the faces of the flat band. This is followed by a piece of 1000 grit sandpaper to remove the scratches left by the 800 grit sandpaper and finally a pice of 2000 grit sandpaper to remove the scratches from the 1000 grit sand paper.
This is a point where the rings either get formed into a circle or they receive more work depending upon the design for the finished piece. If these rings were to be plain hammered bands they would be ready for forming then soldering. These two rings, however are to be stamped, one with Ogham one with English.
Part 4 will be posted on Friday 11/8/13
Torch Forged Rings
Part 3 - Cutting and Preparing the Ring Shanks
made by AshUnicorn's Garden
Part 3 begins with cutting the prepared ring band stock from part 2 into the right size/s for the ring/s.
 |
| Forged Bands Cut to Size for the rings |
I use a chart that I created years ago in conjunction with my ring mandrel to determine what length to cut the ring bands. The chart has full and half ring sizes from size 1 to size 17.5 with their corresponding circumference in inches. The circumference length in my chart is
a little smaller than the actual finished size but the reason for that comes in later.
 |
| First File and Sanding for the cut ring bands |
With the ring bands cut to their proper length I then start the filing and sanding process. I use a hand file to smooth both sides of the silver leaving the edges alone at this stage. This stage is to even out the high and low parts created by the hammer from what will be the inside and outside of the ring. I use the fire scale on the silver to determine when this process is finished. Fire scale is the dark coloring left on a piece of silver (or other metal) from either a casting or torch heating process. It is essentially a coating of oxidized silver. Once the flat silver bands are smoothed out with the file the sanding process begins. I start with a piece of 800 grit sandpaper on a sanding stick to remove the file marks
 |
| Sanded - 800 grit on sanding stick w/ small untouched piece |
This is a point where the rings either get formed into a circle or they receive more work depending upon the design for the finished piece. If these rings were to be plain hammered bands they would be ready for forming then soldering. These two rings, however are to be stamped, one with Ogham one with English.
Part 4 will be posted on Friday 11/8/13
Friday, October 25, 2013
Handmade Torch Forged Rings p2
The following is a continued description of how I make my hand forged rings. It is a long involved process so I am splitting this description into several posts. This is the second of these posts. Part 1 can be read here.
Forming the silver for the band is a slow process. Each time the hot silver contacts the steel pounding block and the hammer contacts the silver it is cooled by the steel. After several strikes the silver is placed back on the charcoal to be heated again. Once heated the silver is again placed on the pounding block and hammered closer to its finished shape. This process continues until the silver is the right width and thickness for a ring band.
I have never counted the number of times the silver goes from heated to hammered and back again but it is quite a few. Each photo of the silver being shaped is after about an hours worth of heating and hammering. After each session of hammering I let the silver air cool on the charcoal blocks or the heat-reflective soldering pad beneath the charcoal blocks.
With most torch work I quench the piece in water for a quick cool down but never with forged rings. With forged rings the slow cool down of the silver is very important. It has to do with keeping the molecular structure that is created through the heating and hammering process. As I said I have never been formally trained in forging so I don't really know all of the specifics but I do know if the silver is quenched at any point it ends up being annealed. Annealing is a process of heating and quenching metal to make it softer. That would make all of the hammering done to the silver a complete waste of time in about 30 seconds.
After the silver ingot has been hammered into the right width and thickness for a band it is time to cut the silver to the proper length for a ring. I will state here that the "right" width and thickness for the bands is not a precise measurement. All of this work is being done by hand and not a machine so the thickness and width does vary slightly from ring to ring. I try to keep these variances below 1 mm though by comparing the hammered metal to 18 gauge sheet sterling and comparing it to other rings I have made that are 3/16" wide.
Torch Forged Rings
Part 2 - Forming the Ring Stock
made by Ash
Unicorn's Garden
Part 2 begins with forming the prepared ingot from part 1 into the ring band stock.Part 2 - Forming the Ring Stock
made by Ash
Unicorn's Garden
 |
| Ingot After First Hammering Session |
 |
| Second Hammering Increases Length - still too thick |
With most torch work I quench the piece in water for a quick cool down but never with forged rings. With forged rings the slow cool down of the silver is very important. It has to do with keeping the molecular structure that is created through the heating and hammering process. As I said I have never been formally trained in forging so I don't really know all of the specifics but I do know if the silver is quenched at any point it ends up being annealed. Annealing is a process of heating and quenching metal to make it softer. That would make all of the hammering done to the silver a complete waste of time in about 30 seconds.
 |
| Third Hammering Continues to Increase Length & Thin Band |
After the silver ingot has been hammered into the right width and thickness for a band it is time to cut the silver to the proper length for a ring. I will state here that the "right" width and thickness for the bands is not a precise measurement. All of this work is being done by hand and not a machine so the thickness and width does vary slightly from ring to ring. I try to keep these variances below 1 mm though by comparing the hammered metal to 18 gauge sheet sterling and comparing it to other rings I have made that are 3/16" wide.
 | |
| Fourth & Final Hammering - The band is ready to be cut |
Part 3 will be posted on Friday 11/1/13
Friday, October 11, 2013
Handmade Torch Forged Rings p1
The following is a description of how I begin making my hand forged rings. It is a long involved process so I am splitting this description into several posts. This is the first of these posts.

Although I have not been formally trained in the ways of forging I have developed a process of torch forging sterling silver rings. This process began with our wedding bands. I wanted to create rings that weren't part of my standard ring lines at the time. Something that would be meaningful to both of us. The result was beautiful sterling silver rings that are stronger than sterling silver usually is.
I have made other forged rings since making our wedding bands. With the most recent forged rings I made I decided to photographically document the steps of the process I use.
I begin with pieces of sterling silver that would otherwise be sent back to my silver supplier. These pieces are placed in a clay/silica crucible with some boric acid and melted with a torch. Once the silver is liquified and impurities are pulled out with a carbon rod I pour the silver into the trough of a cuttle bone that I prepared before melting the silver. I let the silver solidify into a rough ingot (usually more lump shaped than anything else) I quench it in water.
As I don't often have enough time in one day to make a ring from beginning to end I usually schedule the different steps with my other work over a course of several days. Thus why I quench the ingot instead of getting straight to forming it.
When it is time to start forging the ingot into a ring I set it on a piece of charcoal with another piece forming a wall behind it and start heating it with a torch. The charcoal not only provides a heat shield for my working surface but also reflects the heat back into the silver I am working with. Once the ingot is glowing orange I pick it up with a pair of pliers, place it on my steel pounding block, and start hitting it with a steel hammer. I find this to be a particularly fun part of the process as it can be very therapeutic repeatedly hitting something with a hammer for creative rather than destructive means.

Torch Forged Rings
Part 1 - Melting to Hammering
made by Ash
Unicorn's Garden
Part 1 - Melting to Hammering
made by Ash
Unicorn's Garden

Although I have not been formally trained in the ways of forging I have developed a process of torch forging sterling silver rings. This process began with our wedding bands. I wanted to create rings that weren't part of my standard ring lines at the time. Something that would be meaningful to both of us. The result was beautiful sterling silver rings that are stronger than sterling silver usually is.
I have made other forged rings since making our wedding bands. With the most recent forged rings I made I decided to photographically document the steps of the process I use.
 |
| Sterling Silver Pieces in curable with cuttle bone trough |
I begin with pieces of sterling silver that would otherwise be sent back to my silver supplier. These pieces are placed in a clay/silica crucible with some boric acid and melted with a torch. Once the silver is liquified and impurities are pulled out with a carbon rod I pour the silver into the trough of a cuttle bone that I prepared before melting the silver. I let the silver solidify into a rough ingot (usually more lump shaped than anything else) I quench it in water.
As I don't often have enough time in one day to make a ring from beginning to end I usually schedule the different steps with my other work over a course of several days. Thus why I quench the ingot instead of getting straight to forming it.
 |
| Sterling Silver ingot, after cooling, in crucible |
When it is time to start forging the ingot into a ring I set it on a piece of charcoal with another piece forming a wall behind it and start heating it with a torch. The charcoal not only provides a heat shield for my working surface but also reflects the heat back into the silver I am working with. Once the ingot is glowing orange I pick it up with a pair of pliers, place it on my steel pounding block, and start hitting it with a steel hammer. I find this to be a particularly fun part of the process as it can be very therapeutic repeatedly hitting something with a hammer for creative rather than destructive means.

Part 2 will be posted on Friday 10/18/13
Saturday, September 7, 2013
So it has been far to long since I have posted anything to my blog. After ending up with far more to do than time in a day I had to put some things on hold. This blog was one of them. Now situations have changed again and I will be getting back to posting. I don't know how regularly, however, a new post is in the works.... well other than this one. During the time I have not been posting I have been continuing to create new jewelry designs and honing my craft through working on pieces for both stock and as custom orders.
One of the latest things I have worked on is forged rings. That will be the topic of my next post. In preparation for that I have taken photos throughout the different steps of torch forging sterling silver rings. The forging process I use makes the rings stronger than sterling silver usually is.
With the photos I will describe how I turned this mess of different sterling pieces into a ring.

One of the latest things I have worked on is forged rings. That will be the topic of my next post. In preparation for that I have taken photos throughout the different steps of torch forging sterling silver rings. The forging process I use makes the rings stronger than sterling silver usually is.
With the photos I will describe how I turned this mess of different sterling pieces into a ring.
Sunday, April 4, 2010
Monday Feature - Etsy West Michigan Team
Today I am sharing some of the newest items from the Etsy West Michigan Team. To view more items from this team go to Etsy and search handmade for "etsywmi team".

Made by You Stink Soap
www.YouStinkSoap.etsy.com
**********************************************
Lovely Lavendar Sachets - Set of 3 - Regans Garden Collection
 Made by Mom N Mia Quilts
www.MomNMiaQuilts.etsy.com
*******************************************
Large Sterling Silver Tree of Life Necklace
 Made by JustJaynes
www.JustJaynes.etsy.com
Strawberry Rhubarb Glycerin Soap - Vegan
Made by You Stink Soap
www.YouStinkSoap.etsy.com
**********************************************
Lovely Lavendar Sachets - Set of 3 - Regans Garden Collection
Made by Mom N Mia Quiltswww.MomNMiaQuilts.etsy.com
*******************************************
Large Sterling Silver Tree of Life Necklace
Made by JustJayneswww.JustJaynes.etsy.com
Monday, March 29, 2010
Monday Featured Artisan - Dee's Adornments
I would like to introduce you to the work of Dee's Adornments:
 What do you make?
Jewelry and some related housewares like wine glass charms. I expect to branch out more but to stay within the accessories side of things. I'm fond of variety.
What drew you to your craft and why did you start selling your items?
I used to do stained glass and mosaics. I'm drawn to the play of light and color and shine. So when I looked for a hobby that didn't exile me into the garage, I found a class on making jewelry. It sounded like something I would enjoy so I went, and it didn't take long to realize how much I was enjoying myself.
Oddly I enjoy designing and making jewelry more than actually wearing it. The problem with this combination is that I'd go broke making everything I want to make! So when I ordered my first set of supplies I planned on making Christmas gifts, and items to sell, in hopes that it would help me buy more supplies, etc. Since I've sold stained glass in the past it wasn't too far-fetched to look at doing the same with jewelry, though I didn't approach selling my glass products as seriously as I'm taking my jewelry business.
 What is your favorite part of creating your items?
I like variety and I like to experiment, so sometimes I'll have spent time trying many different things before I finally hit that moment where I go "Yes!" and know I've got it. The process of actually assembling the pieces can feel very zen, so I enjoy that too. I've been writing professionally through my entire adult life and wrote prolifically in school as well, but writing is a very cerebral pursuit and can result in me getting too stuck in my head. The ability to achieve some mental quiet and just enjoy making something with my own hands is precious.
Is your craft a full time endeavor or a hobby?
Part-time business. For my "day job" I'm a technology writer and journalist, but this year my goal is to have jewelry account for 50% of my income. That might be expecting too much of my first full year but I like to aim high.
 When you aren't working on your craft what do you enjoy doing?
Right now I'm volunteering with the 2010 Winter Olympics (http://dee-annleblanc.com/2010/02/15/the-olympic-volunteer-experience-part-1/) and so far it's incredibly rewarding. It's really eaten into my business time as I'm doing 15 shifts, but I'm trying to be flexible and do things like renew, where normally I prefer to list a new item every day instead.
Outside of that, I enjoy playing with my dogs, playing games on my PS3, and generally being a geek.
Is there anything else about your craft or yourself you would like to share?
I used to think that I'm a lucky person and opportunity just fell into my lap, when it came to my writing career. One day I finally realized that my career wasn't so much about luck as it was about being open to opportunity, recognizing it, and reaching out for it before it passed me by. Doing this means being open to rejection. I don't enjoy that any more than anyone else does, approaching life with an attitude of "it never hurts to ask" is an important part of constantly taking yourself to the next level. That and just pushing yourself to be more.
I try to remember this as I work on my jewelry and building my jewelry business.
My locations online:
shop: http://deesadornments.etsy.com/
blog: http://deesadornments.wordpress.com/
twitter: http://twitter.com/deesadornments
facebook: http://facebook.com/deesadornments
Pieces in this post:
1. Granite, Serpentine, and Sterling Silver Chandelier Earrings
2. Third Chakra Thumblet in Amber for Energy Work
3. Four Seasons Memory Wire Bracelet in Glass, Silver, and Gold
What do you make?Jewelry and some related housewares like wine glass charms. I expect to branch out more but to stay within the accessories side of things. I'm fond of variety.
What drew you to your craft and why did you start selling your items?
I used to do stained glass and mosaics. I'm drawn to the play of light and color and shine. So when I looked for a hobby that didn't exile me into the garage, I found a class on making jewelry. It sounded like something I would enjoy so I went, and it didn't take long to realize how much I was enjoying myself.
Oddly I enjoy designing and making jewelry more than actually wearing it. The problem with this combination is that I'd go broke making everything I want to make! So when I ordered my first set of supplies I planned on making Christmas gifts, and items to sell, in hopes that it would help me buy more supplies, etc. Since I've sold stained glass in the past it wasn't too far-fetched to look at doing the same with jewelry, though I didn't approach selling my glass products as seriously as I'm taking my jewelry business.
What is your favorite part of creating your items?I like variety and I like to experiment, so sometimes I'll have spent time trying many different things before I finally hit that moment where I go "Yes!" and know I've got it. The process of actually assembling the pieces can feel very zen, so I enjoy that too. I've been writing professionally through my entire adult life and wrote prolifically in school as well, but writing is a very cerebral pursuit and can result in me getting too stuck in my head. The ability to achieve some mental quiet and just enjoy making something with my own hands is precious.
Is your craft a full time endeavor or a hobby?
Part-time business. For my "day job" I'm a technology writer and journalist, but this year my goal is to have jewelry account for 50% of my income. That might be expecting too much of my first full year but I like to aim high.
When you aren't working on your craft what do you enjoy doing?Right now I'm volunteering with the 2010 Winter Olympics (http://dee-annleblanc.com/2010/02/15/the-olympic-volunteer-experience-part-1/) and so far it's incredibly rewarding. It's really eaten into my business time as I'm doing 15 shifts, but I'm trying to be flexible and do things like renew, where normally I prefer to list a new item every day instead.
Outside of that, I enjoy playing with my dogs, playing games on my PS3, and generally being a geek.
Is there anything else about your craft or yourself you would like to share?
I used to think that I'm a lucky person and opportunity just fell into my lap, when it came to my writing career. One day I finally realized that my career wasn't so much about luck as it was about being open to opportunity, recognizing it, and reaching out for it before it passed me by. Doing this means being open to rejection. I don't enjoy that any more than anyone else does, approaching life with an attitude of "it never hurts to ask" is an important part of constantly taking yourself to the next level. That and just pushing yourself to be more.
I try to remember this as I work on my jewelry and building my jewelry business.
My locations online:
shop: http://deesadornments.etsy.com/
blog: http://deesadornments.wordpress.com/
twitter: http://twitter.com/deesadornments
facebook: http://facebook.com/deesadornments
Pieces in this post:
1. Granite, Serpentine, and Sterling Silver Chandelier Earrings
2. Third Chakra Thumblet in Amber for Energy Work
3. Four Seasons Memory Wire Bracelet in Glass, Silver, and Gold
Monday, March 8, 2010
Monday Feature
Some of the newest creations by the Etsy West Michigan Team
To find more of the fabulous works by the Etsy West Michigan Team go to Etsy.com and search for etsywmi team
 HAVE A HEART - Genuine Drilled Beach Stones - Slag Glass Set - focal jewelry beads
by
StoneMe
www.StoneMe.etsy.com
*****************************************
 Exotic Coconut Body Butter with Cocoa and Shea - 4 ounces - Vegan
by
You Stink Soap
www.YouStinkSoap.etsy.com
*******************************************
 Wine Bottle Bling
by
One Haute Hostess
www.onehautehostess.etsy.com
To find more of the fabulous works by the Etsy West Michigan Team go to Etsy.com and search for etsywmi team
HAVE A HEART - Genuine Drilled Beach Stones - Slag Glass Set - focal jewelry beadsby
StoneMe
www.StoneMe.etsy.com
*****************************************
Exotic Coconut Body Butter with Cocoa and Shea - 4 ounces - Veganby
You Stink Soap
www.YouStinkSoap.etsy.com
*******************************************
Wine Bottle Blingby
One Haute Hostess
www.onehautehostess.etsy.com
Monday, March 1, 2010
Monday Featured Artisan - Jasmine Worth
Today's Featured artisan is Jasmine Worth
Jasmine's work can be purchased at JasmineWorth.etsy.com. More of her work and information about her work can also be found at JasmineWorth.com.
 What do you make?
I am an oil painter.
What drew you to your craft and why did you start selling your items?
I have always been as artist, since as far back as I can remember I was drawing or painting. I started selling my artwork on etsy because I wanted to make original art available to everyone. I want anyone who enjoys my art to be able to afford a print or something with my art on it. I have shown in galleries for many years now, but I know that not all people are able to afford original art from a gallery. Selling on etsy allows me to make my work available to those people, as well.

What is your favorite part of creating your items?
My favorite part of painting is the last stage, where I get to put in all the details and highlights. I love seeing the painting come together into the finished product.
Is your craft a full time endeavor or a hobby?
I am a full time painter. I worked at a record store for many years, after the store closed in 2009, I decided to try my hand at being a full time artist. Hopefully the etsy store will help me to achieve this dream :)
When you arn't working on your craft what do you enjoy doing?
I am an avid reader. My house is crammed full of books, they are stacked nearly up to the ceiling in some places! I also enjoy hanging out with my cat Punkin, and watching cartoons.

Etsy Shop: JasmineWorth.etsy.com
More info/images: JasmineWorth.com
Art shown here:
1. 'Midnight Dreary' - Original Oil Painting
2. 'Detached' - Fine Art Print
3. 'Suspended' - Fine Art Print
Jasmine's work can be purchased at JasmineWorth.etsy.com. More of her work and information about her work can also be found at JasmineWorth.com.
What do you make?I am an oil painter.
What drew you to your craft and why did you start selling your items?
I have always been as artist, since as far back as I can remember I was drawing or painting. I started selling my artwork on etsy because I wanted to make original art available to everyone. I want anyone who enjoys my art to be able to afford a print or something with my art on it. I have shown in galleries for many years now, but I know that not all people are able to afford original art from a gallery. Selling on etsy allows me to make my work available to those people, as well.
What is your favorite part of creating your items?
My favorite part of painting is the last stage, where I get to put in all the details and highlights. I love seeing the painting come together into the finished product.
Is your craft a full time endeavor or a hobby?
I am a full time painter. I worked at a record store for many years, after the store closed in 2009, I decided to try my hand at being a full time artist. Hopefully the etsy store will help me to achieve this dream :)
When you arn't working on your craft what do you enjoy doing?
I am an avid reader. My house is crammed full of books, they are stacked nearly up to the ceiling in some places! I also enjoy hanging out with my cat Punkin, and watching cartoons.
Etsy Shop: JasmineWorth.etsy.com
More info/images: JasmineWorth.com
Art shown here:
1. 'Midnight Dreary' - Original Oil Painting
2. 'Detached' - Fine Art Print
3. 'Suspended' - Fine Art Print
Monday, February 22, 2010
Monday Feature
Today I want to share some of the new items from the etsywmi team (Etsy West Michigan team)
 Recycled Handmade Journal - Golden Keys to the Joys of Music
by
ForrestConcepts
www.forrestconcepts.etsy.com
****************************************************
 heather and moss - hand embroidered thread ball - japanese temari
by
julie and co.
www.julieandco.etsy.com
*****************************************************
 Espresso Cup
by
Bella Joy Pottery
www.bellajoy.etsy.com
*******************************************************
 Aqua and Blue Zircon Multistrand Necklace with Sunflower Pendant
by
Abacus Bead Creations
www.abacusbeadcreations.etsy.com
***
You can view more creations from any of these artisans by visiting their Etsy shops
Recycled Handmade Journal - Golden Keys to the Joys of Musicby
ForrestConcepts
www.forrestconcepts.etsy.com
****************************************************
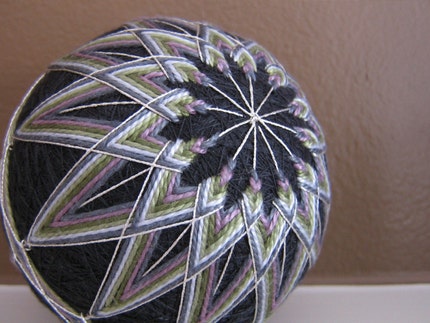 heather and moss - hand embroidered thread ball - japanese temari
by
julie and co.
www.julieandco.etsy.com
*****************************************************
Espresso Cupby
Bella Joy Pottery
www.bellajoy.etsy.com
*******************************************************
Aqua and Blue Zircon Multistrand Necklace with Sunflower Pendantby
Abacus Bead Creations
www.abacusbeadcreations.etsy.com
***
You can view more creations from any of these artisans by visiting their Etsy shops
Monday, February 15, 2010
Monday Featured Artisan - Breath of the Dragon
Today's featured artisan is Breath of the Dragon - unique and custom wood burning by Sunfire
http://www.breathofthedragon.etsy.com
Sunfire is one of my Pagans of Etsy teammates. She is also having a 50% off moving sale in both of her shops
 What do you make?
- Pyrography means "writing with fire", but what I do is more like "drawing with heat", creating art on wood rather than canvas. I love the fact that there are so many things that can be made with wood. In my shop, I have a variety of things, from key chains and cell charms with small wooden disks that I've burned on, to boxes and altar tiles that serve a purpose, to magnets and larger wall art that are simply decorative. Every day, it seems, I have another idea of something that I could burn, create and sell.
What drew you to your craft and why did you start selling your items?
- Being around my mom and other crafters that were selling their art really got me started. I wanted to find something that I enjoyed making that could be profitable as well. After trying other crafts, from painting and sewing to candle-making, I finally came across wood burning. Back in 2006, a friend bought me a pen and a piece of wood from the craft store, and I was hooked. By late 2007, I was having a great time with it, and had lots of positive feedback on the things I had made. It was that energy that told me I was ready to give it a go as a money-making adventure, so I set up shop on Etsy.
What is your favorite part of creating your items?
- The smell of the burning wood, for sure! It gets in my hair, and for days I feel like I was at a campfire... :) Cheesy, I know, but so true. Besides that, I love creating custom pieces, because I know that someone is willing to pay me for my work. I love creating something, knowing that it is exactly what they want. The variety of projects is probably my absolute favorite part, though. It's great to know I can spend 1/2 hr on one piece, and 4 hours on another, and both are wonderful.
 Is your craft a full time endeavor or a hobby?
- I'm hoping to make it full time ASAP, but until then, I work overnight throwing freight at a local grocery store. It's tough balancing both, as well as school and trying to have family time, but I know if I can make it through this, I will have what I want in the end - making enough money doing what I love that I can quit working for someone else and still have the lifestyle I want. It's this image of the end goal that keeps me moving forward, that makes the sacrifices worth it.
When you aren't working on your craft what do you enjoy doing?
- Watching movies or playing games with my boyfriend on the chilly winter evenings. Since I'm going to school for Web Development, it would be silly if I didn't enjoy working on websites... I love the idea of making simple sites for small-biz folks like myself (I created and currently maintain 2 others besides my own). I also love to get out in nature when its warmer, so we do a lot of biking, hiking and exploring the rest of the year.
Is there anything else about your craft or yourself you would like to share?
- While pyrography is my number one crafting adventure, I've also taken on a mission to spread the message of a Pro-Peace symbol. My mom and I started an Etsy shop to sell hand-crafted Turn Peace Around items (http://turnpeacearound.etsy.com). This second shop gives me a chance to explore other crafting methods between wood burning projects. Or, as in recent weeks, to combine the two.
This is a small selection of the items that Sunfire makes, you can see more in both shops:
Breath of the Dragon & Turn Peace Around
Both stores are running a 50% off moving sale! Now is the time to get some great deals on Sunfires handmade works!
Items in this post:
1. Dream Cherish Live plaque
2. original yin yang
3. Smiley Clean/Dirty Magnet
4. Hemp Choker w/ Pyrographed Charm
http://www.breathofthedragon.etsy.com
Sunfire is one of my Pagans of Etsy teammates. She is also having a 50% off moving sale in both of her shops
What do you make?- Pyrography means "writing with fire", but what I do is more like "drawing with heat", creating art on wood rather than canvas. I love the fact that there are so many things that can be made with wood. In my shop, I have a variety of things, from key chains and cell charms with small wooden disks that I've burned on, to boxes and altar tiles that serve a purpose, to magnets and larger wall art that are simply decorative. Every day, it seems, I have another idea of something that I could burn, create and sell.
What drew you to your craft and why did you start selling your items?

- Being around my mom and other crafters that were selling their art really got me started. I wanted to find something that I enjoyed making that could be profitable as well. After trying other crafts, from painting and sewing to candle-making, I finally came across wood burning. Back in 2006, a friend bought me a pen and a piece of wood from the craft store, and I was hooked. By late 2007, I was having a great time with it, and had lots of positive feedback on the things I had made. It was that energy that told me I was ready to give it a go as a money-making adventure, so I set up shop on Etsy.
What is your favorite part of creating your items?
- The smell of the burning wood, for sure! It gets in my hair, and for days I feel like I was at a campfire... :) Cheesy, I know, but so true. Besides that, I love creating custom pieces, because I know that someone is willing to pay me for my work. I love creating something, knowing that it is exactly what they want. The variety of projects is probably my absolute favorite part, though. It's great to know I can spend 1/2 hr on one piece, and 4 hours on another, and both are wonderful.
Is your craft a full time endeavor or a hobby?- I'm hoping to make it full time ASAP, but until then, I work overnight throwing freight at a local grocery store. It's tough balancing both, as well as school and trying to have family time, but I know if I can make it through this, I will have what I want in the end - making enough money doing what I love that I can quit working for someone else and still have the lifestyle I want. It's this image of the end goal that keeps me moving forward, that makes the sacrifices worth it.
When you aren't working on your craft what do you enjoy doing?
- Watching movies or playing games with my boyfriend on the chilly winter evenings. Since I'm going to school for Web Development, it would be silly if I didn't enjoy working on websites... I love the idea of making simple sites for small-biz folks like myself (I created and currently maintain 2 others besides my own). I also love to get out in nature when its warmer, so we do a lot of biking, hiking and exploring the rest of the year.
Is there anything else about your craft or yourself you would like to share?
- While pyrography is my number one crafting adventure, I've also taken on a mission to spread the message of a Pro-Peace symbol. My mom and I started an Etsy shop to sell hand-crafted Turn Peace Around items (http://turnpeacearound.etsy.com). This second shop gives me a chance to explore other crafting methods between wood burning projects. Or, as in recent weeks, to combine the two.
This is a small selection of the items that Sunfire makes, you can see more in both shops:
Breath of the Dragon & Turn Peace Around
Both stores are running a 50% off moving sale! Now is the time to get some great deals on Sunfires handmade works!
Items in this post:
1. Dream Cherish Live plaque
2. original yin yang
3. Smiley Clean/Dirty Magnet
4. Hemp Choker w/ Pyrographed Charm
Monday, February 1, 2010
Monday Feature
Today has been a very busy work day so I have not had the time to put together my usual Featured Artist post. However I would like to share some of the latest creations from the Etsy West Michigan Team....
 Vegan Olive Oil Soap- Simply Unscented
from
showertreatsoap
*********************************************************
 Asian Inspired Floral Toddler Kid Bib
from
luckybugboutique
*****************************************************
 Garnet Red Valentine Heart Cubic Zirconia Drop Wire-Wrapped Earrings
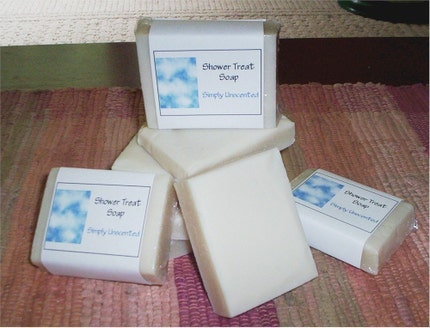 Vegan Olive Oil Soap- Simply Unscented
from
showertreatsoap
*********************************************************
 Asian Inspired Floral Toddler Kid Bib
from
luckybugboutique
*****************************************************
 Garnet Red Valentine Heart Cubic Zirconia Drop Wire-Wrapped Earrings
Monday, January 25, 2010
Monday Featured Artisan - Rainadelmagick
Today's Featured Artisan is Raina Woolfolk of rainadelmagick - curiosities of the fae in art and apothecary.
 I make one-of-a-kind pieces of precious metal, gemstone and vintage glass jewelry that are influenced by my attraction to the feminine fluidity of the art nouveau period and the whimsical inquisitive nature of the Steampunk movement.
I also design crystal wands, with minerals and crystals that I have field collected in my travels around the globe. Each wand is made with intentionality for use in meditation and ritual work.
I grow organic herbs and mix apothecary concoctions of herbal teas, incense and bath soaks
I make creatures out of recycled components and then write children’s stories that mix geology, science, natural history and fantasy to go along with them in order to provide the folks who adopt them with tales to share with each other.
I have also written two screenplays and a book of twisted, humorous poetry.
 I was inspired to design jewelry by my “slight obsession” with crystals and minerals. I have been stuffing them in my pockets since I was a wee lass running away from home to find them in the hills around my house.
I started making crystal wands when the Fae suggested it.
Friends who saw me wearing my own handmade jewelry as a teen would ask for pieces as gifts. They encouraged me to sell my artwork. I started “testing the waters” by selling necklaces and earrings in my mother’s café. As my skills improved I branched out to doing arts and crafts fairs.
 There are times when I will come across a phenomenal stone and I just immediately know how it will develop into a piece of jewelry. I experience a sense of wonder when something I’m making just manifests itself into being. At times like that it seems the Muses are guiding my hands and I can feel the energy raising my joy vibration.
I am most excited when pieces I have made inspire my students to create their own treasures and expand upon my ideas while developing their own style.
I divide my time between my work as an animal behaviorist working with animals who are reactive to elements in their environment, an artist and a teacher at UC Berkeley Art Studio. I have been self-employed for nearly 14 years. I don't make much, but enough for what I need. I am a fortunate woman indeed to have the ability to make my living through pleasurable pursuits.
 When I’m not working or playing at crafting I can be found tooling around on my penny farthing hi-wheel or my vintage 70lb tricycle. I also spend every free moment hiking with my dogs searching for Faeries and mushrooms. I save every penny in order to have travel adventures and make new friends around the world.
This past year and a half I have enjoyed participating in a supportive community of fellow artisans and crafters, the etsy paganteam. We host chats on etsy about all things magickal. The team is very active and involved, we support each other in our growth as artists. I have developed some very dear friendships and am continually learning through the mentorship of fellow team members.
This is a very small selection of the items Raina has to offer. I encourage you to discover the full range of what she has to offer by visiting her shop. Many of her items are one of a kind (OOAK) so check them out before they are gone!
Shop: rainadelmagick
Items in this post:
1. Color Change Andesine Labradorite Feldspar 1.20 Carat in 14K Gold Pendant OOAK
2. Ancient Alchemy double point Quartz Crystal laser wand OOAK
3. Eye of Sauron Mexican Fire Opal OOAK
4. Fall Into Me wildcrafted organic herbal Incense in wood box
I make one-of-a-kind pieces of precious metal, gemstone and vintage glass jewelry that are influenced by my attraction to the feminine fluidity of the art nouveau period and the whimsical inquisitive nature of the Steampunk movement.I also design crystal wands, with minerals and crystals that I have field collected in my travels around the globe. Each wand is made with intentionality for use in meditation and ritual work.
I grow organic herbs and mix apothecary concoctions of herbal teas, incense and bath soaks
I make creatures out of recycled components and then write children’s stories that mix geology, science, natural history and fantasy to go along with them in order to provide the folks who adopt them with tales to share with each other.
I have also written two screenplays and a book of twisted, humorous poetry.
I was inspired to design jewelry by my “slight obsession” with crystals and minerals. I have been stuffing them in my pockets since I was a wee lass running away from home to find them in the hills around my house.I started making crystal wands when the Fae suggested it.
Friends who saw me wearing my own handmade jewelry as a teen would ask for pieces as gifts. They encouraged me to sell my artwork. I started “testing the waters” by selling necklaces and earrings in my mother’s café. As my skills improved I branched out to doing arts and crafts fairs.
There are times when I will come across a phenomenal stone and I just immediately know how it will develop into a piece of jewelry. I experience a sense of wonder when something I’m making just manifests itself into being. At times like that it seems the Muses are guiding my hands and I can feel the energy raising my joy vibration.I am most excited when pieces I have made inspire my students to create their own treasures and expand upon my ideas while developing their own style.
I divide my time between my work as an animal behaviorist working with animals who are reactive to elements in their environment, an artist and a teacher at UC Berkeley Art Studio. I have been self-employed for nearly 14 years. I don't make much, but enough for what I need. I am a fortunate woman indeed to have the ability to make my living through pleasurable pursuits.
When I’m not working or playing at crafting I can be found tooling around on my penny farthing hi-wheel or my vintage 70lb tricycle. I also spend every free moment hiking with my dogs searching for Faeries and mushrooms. I save every penny in order to have travel adventures and make new friends around the world.This past year and a half I have enjoyed participating in a supportive community of fellow artisans and crafters, the etsy paganteam. We host chats on etsy about all things magickal. The team is very active and involved, we support each other in our growth as artists. I have developed some very dear friendships and am continually learning through the mentorship of fellow team members.
This is a very small selection of the items Raina has to offer. I encourage you to discover the full range of what she has to offer by visiting her shop. Many of her items are one of a kind (OOAK) so check them out before they are gone!
Shop: rainadelmagick
Items in this post:
1. Color Change Andesine Labradorite Feldspar 1.20 Carat in 14K Gold Pendant OOAK
2. Ancient Alchemy double point Quartz Crystal laser wand OOAK
3. Eye of Sauron Mexican Fire Opal OOAK
4. Fall Into Me wildcrafted organic herbal Incense in wood box
Subscribe to:
Posts (Atom)

 Posts
Posts

